how to change a tire
A flat tire hits at the worst possible moment — on a dark road, far from home, with nowhere to go. The panic sets in fast. But here is the truth: knowing how to change a tire turns a terrifying situation into a 15-minute fix. This guide gives you the exact steps, the right tools, and the safety know-how to get back on the road with full confidence.
Key Flat Tire Statistics You Need to Know
Understanding how common flat tires are makes it clear why every driver should know how to change a tire before they ever need to.
| Statistic | Data | Source |
| Flat tires occur in the US annually | 220+ million | NHTSA |
| Average drivers experience flat tires per year | 1 in 3 drivers | AAA |
| Drivers who do not know how to change a tire | ~35% | Consumer Reports |
| Time to change a tire (experienced driver) | 10–20 minutes | Bridgestone |
| Roadside flat tire fatalities per year (US) | ~700+ | NHTSA |
| Cost of roadside assistance call-out (average) | $50–$100 | AAA |
| Recommended spare tire speed limit (donut) | Max 50 mph | Michelin |
| Maximum distance on a temporary spare | 50–70 miles | Bridgestone |
| Tire pressure check recommended frequency | Once a month | NHTSA |
| Drivers who check spare tire pressure regularly | Only 11% | Consumer Reports |
What You Need Before You Change a Tire
Every successful tire change starts with the right equipment. Keep these items in your vehicle at all times — not just when a flat happens.
The Essential Tire-Change Kit
- Spare tire (fully inflated — check pressure monthly)
- Car jack (hydraulic floor jack or scissor jack)
- Lug wrench (the correct size for your vehicle’s lug nuts)
- Vehicle owner’s manual (locates jack points)
- Wheel wedges or bricks (prevent rolling)
- Reflective triangles or road flares (safety visibility)
- Flashlight with fresh batteries
- Gloves and a raincoat
- Tire pressure gauge
- Torque wrench (optional but highly recommended)
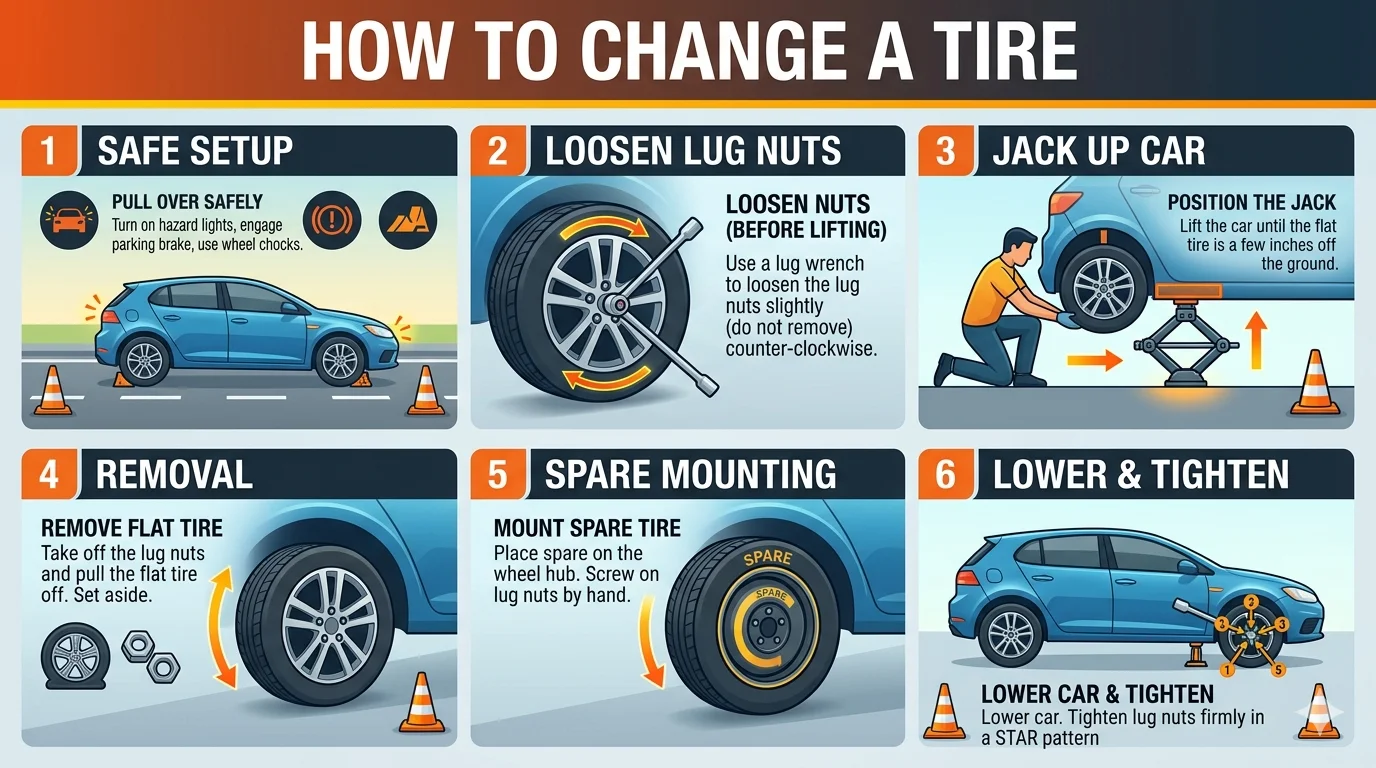
How to Change a Tire: Step-by-Step
Follow every step in order. Skipping steps — especially the safety ones — can turn a flat tire fix into a dangerous accident.
| Step | Action | Time Needed |
| 1 | Move safely off the road and turn on hazard lights | 1–2 min |
| 2 | Apply the parking brake and set wheel wedges | 1 min |
| 3 | Place reflective triangles or road flares | 1 min |
| 4 | Loosen the lug nuts (do not remove yet) | 2 min |
| 5 | Position the car jack under the correct jack point | 1–2 min |
| 6 | Raise the vehicle until the flat tire clears the ground | 2 min |
| 7 | Remove the lug nuts fully and take off the flat tire | 2 min |
| 8 | Mount the spare tire onto the bolts | 1 min |
| 9 | Hand-tighten lug nuts in a star pattern | 1 min |
| 10 | Lower the vehicle and fully tighten lug nuts | 2 min |
| 11 | Check spare tire pressure before driving | 1 min |
| 12 | Secure the flat tire and all tools in your trunk | 1 min |
Step 1: Get Off the Road Safely
Pull completely off the roadway — onto a flat, stable surface such as a parking lot or wide shoulder. Turn on your hazard lights the moment you feel or hear the flat. Never stop on a curve, hill, or narrow bridge.
Step 2: Secure the Vehicle
Apply your parking brake before you do anything else. Place wheel wedges against the tires that stay on the ground. If you changed a rear tire, put the wedges in front of the front tires, and vice versa. This stops the car from rolling while the jack is in place.
Step 3: Set Up Safety Signals
Place reflective triangles at least 10 feet behind the car. If you have road flares, light them and space them further back. Visibility keeps you and other drivers safe — especially at night or in bad weather.
Step 4: Loosen the Lug Nuts First
Use the lug wrench to break the lug nuts loose before lifting the car. Turn counterclockwise. This matters because the tire is still on the ground — it stays still while you apply force. If you wait until the car is jacked up, the wheel will just spin.
Step 5 & 6: Jack Up the Car Correctly
Find the correct jack point in your owner’s manual — most vehicles have reinforced spots along the frame near each wheel. Placing the jack anywhere else can damage your car’s body or cause the jack to slip. Raise the vehicle until the flat tire sits about six inches off the ground.
Steps 7 & 8: Swap the Tires
Remove the lug nuts and put them somewhere safe — a pocket, a cup holder, or the wheel well. Pull the flat tire off and set it aside. Lift the spare onto the bolts. The valve stem (the small rubber nozzle) should face outward, away from the car.
Steps 9 & 10: Tighten in a Star Pattern
Hand-tighten each lug nut first. Then lower the vehicle until the tire touches but the full vehicle weight is not yet on it. Now fully tighten in a star or cross pattern — not a circle. This keeps the wheel even and prevents wobbling. Aim for 80–100 ft-lbs of torque with a torque wrench.
Steps 11 & 12: Check Pressure and Pack Up
Check the spare’s pressure with your tire gauge before you drive. A donut spare needs 60 psi — your owner’s manual confirms the exact number. Stow the flat tire, lug wrench, jack, and all tools before you leave.
Tire Change Safety Rules That Could Save Your Life
Knowing how to change a tire means nothing if you cut corners on safety. These rules come directly from NHTSA’s roadside safety guidelines.
- Always move the car as far from traffic as physically possible.
- Never lie under a vehicle that is lifted on a jack — jacks can fail.
- Keep all bystanders, especially children, away from the work area.
- Wear your safety vest or brightly colored clothing if you have one.
- If you cannot safely complete the tire change, call for roadside help.
- Do not use a spare tire as a permanent fix — replace the flat within 50 miles.
Lug Nut Torque Specifications by Vehicle Type
Proper torque keeps your wheel attached. Too loose and the wheel can wobble or fall off. Too tight and you risk stripping the threads. Here are standard torque ranges by vehicle class.
| Vehicle Type | Lug Nut Size | Torque (ft-lbs) | Common Examples |
| Compact Car | 12mm x 1.5 | 75–95 | Toyota Corolla, Honda Civic |
| Midsize Sedan | 12mm x 1.5 | 85–100 | Toyota Camry, Honda Accord |
| Full-Size SUV | 14mm x 1.5 | 100–120 | Ford Explorer, Chevy Tahoe |
| Pickup Truck | 14mm x 1.5 | 110–145 | Ford F-150, Ram 1500 |
| Minivan | 12mm x 1.5 | 90–100 | Honda Odyssey, Chrysler Pacifica |
| Performance Car | 12mm x 1.25 | 85–100 | Honda Civic Si, Subaru WRX |
| Heavy Truck / 3/4-ton | 14mm x 2.0 | 130–165 | Ford F-250, Ram 2500 |
Always check your owner’s manual for your specific vehicle’s torque spec. These figures are reference ranges, not universal rules.
Types of Spare Tires: Which One Does Your Car Have?
Not every spare tire is the same. Knowing what you’re working with before a flat happens makes the change faster and safer.
| Spare Type | Speed Limit | Max Distance | Best For | Notes |
| Full-Size Matching | Normal | Unlimited | Long trips, rural areas | Same size as regular tire — best option |
| Full-Size Non-Matching | Normal | Limited (get balanced) | Daily commuters | Works well but may affect handling |
| Compact Spare (Donut) | 50 mph max | 50–70 miles | Emergencies only | Do not use for highway driving at full speed |
| Run-Flat Tire | 50 mph | Up to 50 miles | Performance vehicles | Cannot be repaired — must be replaced |
| Folding Spare (Inflatable) | 50 mph max | 50 miles | Newer compact cars | Requires portable inflator — check kit regularly |
How to Check Spare Tire Pressure the Right Way
A flat spare tire is just as useless as a flat road tire. Check your spare’s pressure every single month — it loses about 1–2 psi every 30 days just sitting in the trunk.
- Remove the valve stem cap from the spare tire.
- Firmly press the tire gauge against the valve stem.
- Read the psi number on the gauge display.
- Compare it to the recommended pressure on your door jamb sticker or owner’s manual.
- Add air if needed using a portable compressor or gas station pump.
- Replace the valve stem cap securely.
| Pro Tip — Donut Spare Pressure Most compact spare (donut) tires require 60 psi — significantly higher than a regular tire. If yours reads below 50 psi, do not drive on it. Carry a small portable inflator in your trunk alongside your jack and lug wrench. |
7 Mistakes People Make When Changing a Tire (And How to Avoid Them)
Most tire-change problems come from a few predictable errors. Here is what to watch for.
| Mistake | What Happens | The Fix |
| Jacking the car at the wrong point | Bends frame, damages car body | Always follow owner’s manual jack points |
| Tightening lug nuts in a circle pattern | Wheel sits uneven — wobbles at speed | Always tighten in a star/cross pattern |
| Not loosening lug nuts before jacking | Wheel spins freely — impossible to remove | Break lug nuts loose while tire is on ground |
| Skipping the spare pressure check | Spare is flat — entire process was pointless | Check monthly and before every long trip |
| Driving on a donut above 50 mph | Spare fails — causes another blowout | Drive slowly and get to a tire shop quickly |
| Forgetting wheel wedges | Car rolls off the jack — serious injury risk | Always wedge the tires before lifting the car |
| Leaving the flat tire in the road | Hazard for other drivers | Move flat tire to trunk immediately |
What to Do After You Change a Tire
The spare gets you moving, but your work is not finished yet. Take these steps within 24 hours of any tire change.
- Drive at reduced speed (below 50 mph) until you reach a tire shop.
- Have a professional re-torque the lug nuts after 50 miles of driving.
- Inspect the flat tire at the shop — many flats are repairable for under $30.
- Replace the spare or have it re-inflated and stored properly in your trunk.
- Check all four remaining tires for pressure and visible damage.
- Note the date of the flat and the mileage in your car maintenance log.
When You Should NOT Attempt to Change a Tire Yourself
Most flat tires are safe to change yourself. But there are situations where calling for help is the smarter and safer choice.
- You are on a high-speed freeway with no safe shoulder space.
- The flat tire is on the traffic side of the vehicle.
- You are on a bridge, in a tunnel, or on a steep incline.
- It is nighttime with poor visibility and no road flares.
- You are in an unfamiliar or unsafe area alone.
- Two or more tires are flat at the same time.
- Your spare is also flat or damaged.
In any of these cases, stay inside your vehicle with your seatbelt on, turn on your hazard lights, and call AAA, your roadside assistance provider, or emergency services.
How to Prevent Flat Tires Before They Happen
The best way to deal with a flat tire is to avoid one. These maintenance habits — backed by Michelin and NHTSA guidelines — dramatically cut your blowout risk.
Prevention Habit Frequency Why It Matters
Check tire pressure (all 4 tires + spare) Monthly Under-inflation is the #1 cause of blowouts
Inspect tread depth with a penny test Monthly Worn tread reduces grip and increases blowout risk
Rotate tires Every 5,000–7,500 miles Even wear extends tire life by 30–50%
Wheel alignment check Every 10,000 miles or after impact Misalignment causes uneven wear and blowouts
Inspect tires visually for cuts, bulges, nails Weekly Early detection prevents most roadside flats
Replace tires (age-based) Every 6 years regardless of tread Rubber degrades internally even without visible damage
Avoid overloading the vehicle Always Excess weight over-stresses sidewalls
Frequently Asked Questions About How to Change a Tire
Q1: How long does it take to change a tire?
An experienced driver can change a tire in 10 to 20 minutes. If you are doing it for the first time, allow 30 minutes. Practicing in your driveway before an emergency happens is one of the smartest things you can do.
Q2: Can I change a tire without a jack?
No. You need a jack to lift the vehicle safely off the ground. Never slide under a vehicle that is not properly supported. Without a jack, call for roadside assistance — attempting to change a tire without one creates serious injury risk.
Q3: Is it safe to drive on a spare tire on the highway?
Only full-size matching spares are safe for highway speeds. Donut (compact) spares have a strict 50 mph speed limit and a 50–70 mile range. Run-flat tires also cap at 50 mph for up to 50 miles. Check your spare type before you drive.
Q4: How do I know which direction to turn the lug wrench?
Turn counterclockwise (left) to loosen lug nuts and clockwise (right) to tighten them. The memory trick: ‘righty tighty, lefty loosey.’ This works on all standard lug nuts.
Q5: What if I can’t loosen the lug nuts?
If the lug nuts will not budge, try placing the wrench at the 9 o’clock position and pressing down with your foot. The added body weight creates more torque. If they were overtightened with an impact wrench at a shop, a breaker bar or calling roadside assistance may be needed.
Q6: How do I know if my spare tire is still good?
Check it monthly for proper pressure (usually 60 psi for donut spares) and inspect it visually for cracks or dry rot. Replace a spare that is more than 10 years old, even if it looks fine. Age-related rubber degradation makes it unsafe even with good tread.
Change Your First Tire Before You Need To
Knowing how to change a tire is one of those skills that sits quietly in the background — right up until the moment it matters more than anything else. A flat tire in the right situation is manageable, quick, and even empowering when you are prepared.
Every step in this guide comes from real automotive safety standards, not guesswork. Practice it once in your driveway. Check your spare’s pressure this week. Keep your kit organized and complete. When the flat hits — and it will — you will be the calm, capable person who handles it in under 20 minutes.
Share this guide with someone you care about. A friend or family member who knows how to change a tire is a safer driver. And if you found this guide helpful, bookmark it and check back — we update it regularly as tire technology and safety standards evolve.
Take Action Now
Check your spare tire pressure today. It takes less than 2 minutes and could save you from being stranded. Open your trunk, find the spare, press a gauge to the valve, and top it up to the recommended psi. That one habit puts you ahead of 89% of drivers on the road.